
If your freezer is more empty promises than actual dinners, these stuffed bell peppers with ground beef are worth adding to the rotation.
They’re built to double as a stash of make-ahead meals, so on the nights you don’t have it in you to cook, you’ve already done the work weeks ago.
This version leans on a simple trick most stuffed pepper recipes skip: building the filling with a little tomato sauce and Worcestershire sauce instead of just piling on more seasoning.
It keeps the beef moist, gives the filling real depth, and means the peppers still taste good on day three, not just fresh out of the oven.
Below you’ll find the full recipe, a few swaps depending on what’s in your kitchen, and exactly how to freeze a batch so it’s ready whenever you need it.
Check out more delicious ground beef recipes for budget-friendly family dinners.
Classic Stuffed Bell Peppers with Ground Beef
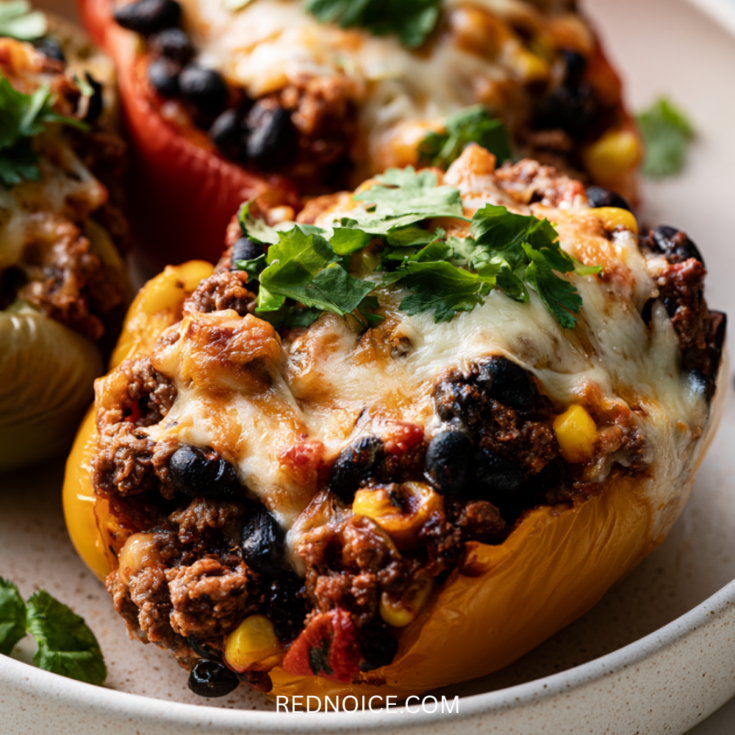
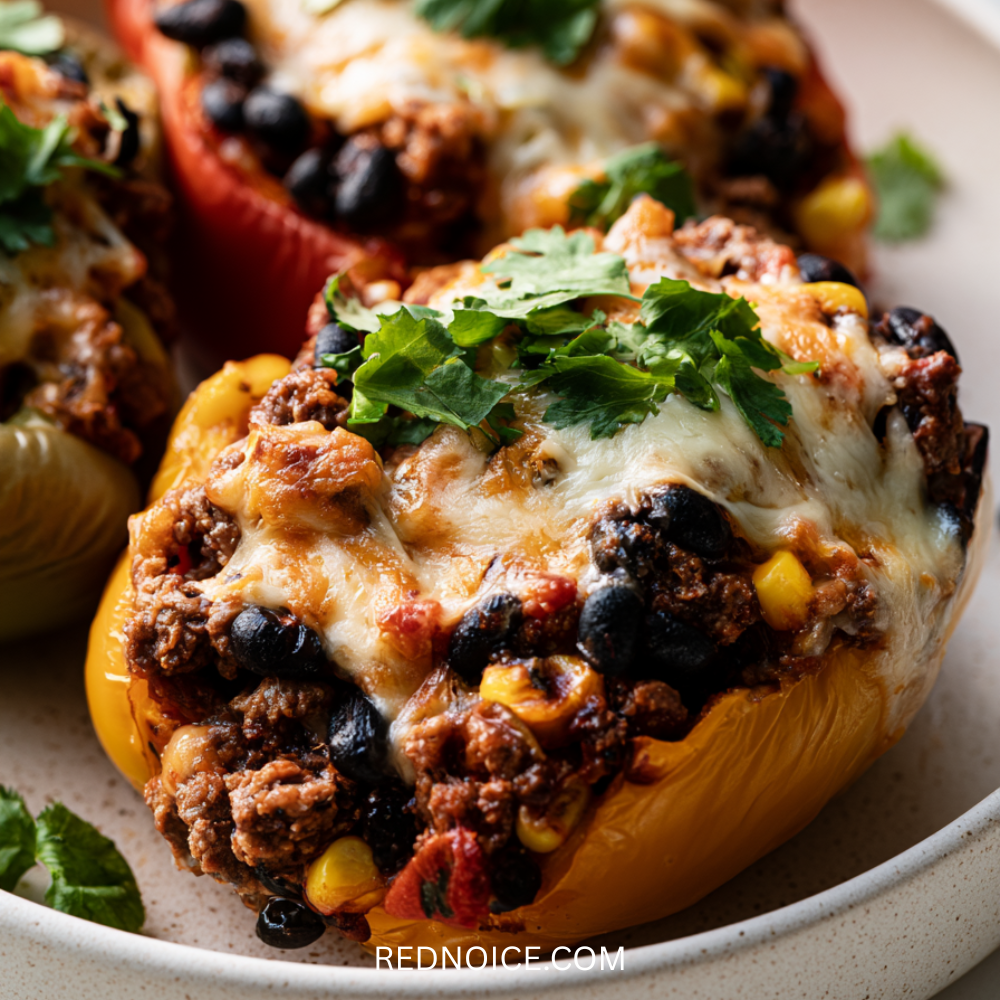
These classic stuffed bell peppers are everything comfort food should be — savory ground beef, rice, and melted cheddar packed into tender roasted peppers. A hearty, satisfying dinner that looks like it took a lot more effort than it actually did.
Ingredients
- 6 large bell peppers, any color, halved lengthwise and seeds removed
- 1 tablespoon olive oil
- 1 small yellow onion, diced
- 3 cloves garlic, minced
- 1 1/2 pounds lean ground beef (90/10)
- 1 teaspoon smoked paprika
- 1 teaspoon dried oregano
- 1/2 teaspoon ground cumin
- 1 can (15 ounces) tomato sauce, divided
- 1 tablespoon Worcestershire sauce
- 1 cup cooked white or brown rice
- Salt and black pepper, to taste
- 1 1/2 cups shredded cheddar cheese, divided
- Fresh parsley, chopped, for garnish
Instructions
- Preheat the oven to 375°F. Arrange the pepper halves cut-side up in a 9x13-inch baking dish.
- Heat the olive oil in a large skillet over medium heat. Add the onion and cook for 4 minutes, until softened. Add the garlic and cook for 30 more seconds, until fragrant.
- Add the ground beef to the skillet. Cook, breaking it up as you go, until browned all the way through, about 6-7 minutes. Drain any excess fat.
- Stir in the smoked paprika, oregano, cumin, salt, and pepper.
- Add 3/4 of the tomato sauce, the Worcestershire sauce, and the cooked rice. Simmer for 3 to 4 minutes, stirring occasionally, until the mixture thickens slightly and coats the beef.
- Remove from heat and stir in 1/2 cup of the shredded cheese.
- Spoon the filling into the pepper halves, packing it in gently so each one is full.
- Mix the remaining tomato sauce with 1/4 cup water and pour it into the bottom of the baking dish around the peppers. This keeps them from drying out as they bake.
- Cover the dish tightly with foil and bake for 30 minutes.
- Remove the foil, top each pepper with the remaining cheese, and bake uncovered for 10 to 12 minutes more, until the peppers are tender and the cheese is melted and starting to brown.
- Let the peppers rest for 5 minutes, garnish with parsley, and serve.
Nutrition Information:
Yield:
6Serving Size:
1Amount Per Serving: Calories: 645Total Fat: 38gSaturated Fat: 18gUnsaturated Fat: 20gCholesterol: 165mgSodium: 729mgCarbohydrates: 25gFiber: 4gSugar: 7gProtein: 49g
All nutritional values provided on this website (including calories, macros, and nutrient percentages) are estimates intended for informational and educational purposes only. These values are calculated using online recipe nutrition databases and software. Because individual cooking methods, product brands, ingredient substitutions, and exact portion sizes vary, the actual nutritional content of your meal may differ from the estimates shown here.
Ingredient Swaps
- Ground turkey instead of beef: Swap in 90/10 ground turkey for a leaner filling. It cooks slightly faster, so start checking for doneness around the 5-minute mark.
- Cauliflower rice instead of rice: Use 1 cup of raw riced cauliflower in place of the cooked rice for a lower-carb version. It releases some water as it cooks, so simmer the filling 1 to 2 minutes longer to keep it from getting watery.
- Pepper jack instead of cheddar: Swap in pepper jack for a little heat without changing anything else in the recipe.
Make-Ahead and Freezer Instructions
To freeze before baking: Assemble the peppers through step 8, then wrap the baking dish tightly in plastic wrap and foil, or transfer the stuffed peppers to a freezer-safe container. Freeze for up to 3 months.
To bake from frozen: Unwrap and bake covered at 375°F for about 55 to 60 minutes, then uncover, top with the remaining cheese, and bake for 10 to 12 more minutes. If you’d rather not add the extra time, thaw the peppers in the fridge overnight and bake as directed above.
Give It a Different Flavor
Once you’ve made the classic version, it’s easy to change things up depending on what you’re in the mood for.
- Mexican-style stuffed peppers: Swap the smoked paprika and oregano for 1 tablespoon of taco seasoning, stir in 1/2 cup black beans and 1/2 cup corn with the rice, and use pepper jack instead of cheddar. Top with fresh cilantro and a squeeze of lime.
- Stuffed peppers with sausage: Swap half the ground beef for Italian sausage for a richer, more savory filling. Drain well since sausage releases more fat than beef.
Storage and Meal Prep for Busy Weeks
Baked leftovers keep well in an airtight container in the fridge for up to 4 days. For meal prep, portion one or two pepper halves per container along with a side, so lunch or dinner is grab-and-go.
For longer storage, baked stuffed peppers also freeze well for up to 3 months. Cool completely before freezing so they don’t turn watery, and reheat covered in the oven at 350°F for about 20 minutes, or in the microwave in 90-second bursts until warmed through.
What to Serve with Stuffed Peppers
These peppers are filling enough on their own, but a simple side rounds out the meal. A green salad with a light vinaigrette adds some freshness, or serve with a slice of crusty bread for scooping up any extra filling. Garlic bread and steamed green beans are easy weeknight options too.
FAQ
Do I have to precook the rice for stuffed peppers?
Yes, in this recipe the rice is already cooked before it goes into the filling. Raw rice won’t fully cook in the time it takes the peppers to bake in the oven, which can leave the filling gritty.
How do I keep stuffed peppers from getting watery?
Bell peppers naturally release some liquid as they bake. Draining the beef well, using cooked (not raw, water-heavy) vegetables in the filling, and not overfilling the peppers all help keep things from getting soupy.
Can I freeze stuffed peppers before baking them?
Yes. Assemble the peppers, wrap the dish tightly, and freeze for up to 3 months. Bake from frozen with extra time, or thaw overnight in the fridge first. Full details are in the Make-Ahead section above.
What’s the best color of bell pepper to use?
Any color works. Green peppers have a slightly more bitter, vegetal flavor, while red, yellow, and orange peppers are sweeter. Red peppers are the most popular choice for this recipe.
Can I make this ahead for meal prep?
Yes. You can fully bake a batch and portion it into containers for the week, or freeze the assembled, unbaked peppers and bake one dish at a time as needed.
How long do leftovers last in the fridge?
Baked stuffed peppers keep for up to 4 days in an airtight container in the fridge.
Can I use ground turkey or ground chicken instead of beef?
Yes, either works well. Ground turkey is called out in the Ingredient Swaps section above, and ground chicken can be swapped in the same way.
Conclusion
Stuffed bell peppers with ground beef are the kind of dinner that solves a problem before it happens. Make a batch, freeze what you don’t need tonight, and you’ve got a real dinner waiting on the nights you don’t want to think about cooking at all. Once you’ve got the base recipe down, it’s easy to switch up the flavors depending on what your family’s in the mood for that week.
If you’re building out your freezer stock, this high-protein beef stew is another great make-ahead option worth adding to the list.