I’ve made a whole lot of chocolate chip cookies over the last few decades. Crispy ones, thick and chunky ones, thin and crisp ones—recipes from childhood, food magazines, and neighbors.
Most were good cookies, but not the kind that disappear instantly at a potluck or the ones you find yourself craving days later. The kind you actually want to share at a party and bring to a picnic in a basket.
I kept searching for what I call the golden combo: a cookie that’s crisp on the edges, soft and chewy on the inside, and with a deeper buttery‑sugar tone. The kind that hints at caramel‑like sweetness instead of tasting like pure sugar.
After much searching, the answer turned out to be brown butter.
Browning the butter, which takes only a few minutes, brings out nuttiness and depth. Suddenly, your cookies become richer, warmer, and genuinely more elevated—bakery‑style cookies with the same ingredients, nothing else added. Next‑level cookies, every single time.

These are the kind of cookies that, once you make your chocolate chip cookies this way, you won’t go back. These will be your best and forever brown butter chocolate chip cookies.
Whether you’re baking a batch for your kiddos on a slow Sunday or for a summer potluck or even Christmas dinner, these cookies will be a huge hit. I promise!
Why Brown Butter Changes Everything

Most cookie recipes use melted butter or room‑temperature butter. Both work perfectly fine. But when you want that toasty, nutty, warm caramel flavor in every bite, browning the butter makes all the difference.
That extra few minutes of slowly browning the butter brings out a nutty aroma that only brown butter can deliver. And that depth of flavor carries through the entire cookie. This is how you take regular chocolate chip cookies and turn them into something that tastes like it came from a bakery — even though your ingredient list stays exactly the same. Same ingredients, a whole new level of flavor.
And all it takes is a small saucepan and a few extra minutes. Worth it, right? It’s simple enough that it almost feels effortless.
Once you make your chocolate chip cookies this way, I’m almost certain you won’t go back.
What Makes a Cookie Soft and Chewy (Not Flat and Crispy)
Now, brown butter adds to the flavor and aroma of these cookies, but other elements in this recipe control the texture, chewiness, and softness. And they don’t happen by accident — they’re deliberately built into the recipe. You don’t need to know all the details to bake a tasty batch of cookies, but if you ever want to make substitutions or change a few steps, it’s good to understand how those choices might affect the final cookie.
Brown sugar vs. white sugar. Brown sugar makes cookies soft because it contains molasses. Molasses adds moisture, giving you that chewy, tender texture. Many soft chocolate chip cookie recipes rely on brown sugar for exactly this reason.
Egg yolk. The extra egg yolk — in addition to the whole egg in the recipe — wasn’t a mistake. That extra yolk adds fat and richness, making the cookies more tender and preventing them from turning cakey.
Resting the dough. Chilling the cookie dough in the fridge helps the fat firm up, which means the cookies spread less and hold their shape better. Aim for at least 30 minutes in the fridge, but if you plan ahead, you can chill overnight for even better results.
Not overbaking. This seems simple, but it’s easy to overbake — especially with cookies meant to stay soft and chewy on the inside. The cookies should look a little underdone when you take them out of the oven. You want the edges set but the centers still slightly glossy. The cookies will continue to firm up as they cool in the pan. If you wait until they look completely done in the oven, they’ll be overbaked by the time they come out and cool.
The Brown Butter Chocolate Chip Cookie Recipe
This is a from‑scratch chocolate chip cookie recipe that’s simple, reliable, and delicious. These cookies genuinely feel like they came from a bakery and require only basic ingredients. You don’t need a stand mixer or expensive ingredients. All you need is about 20 minutes of prep time, 30 minutes of chilling time in the fridge, and 11–13 minutes of baking time.
They’re perfect for any holiday party, outdoor picnic, or BBQ cookout. Or simply on a slow weekend afternoon when the family is home, these freshly baked brown butter chocolate chip cookies are the comfort you need to relax and enjoy quality time at home.
The Best Brown Butter Chocolate Chip Cookie Recipe
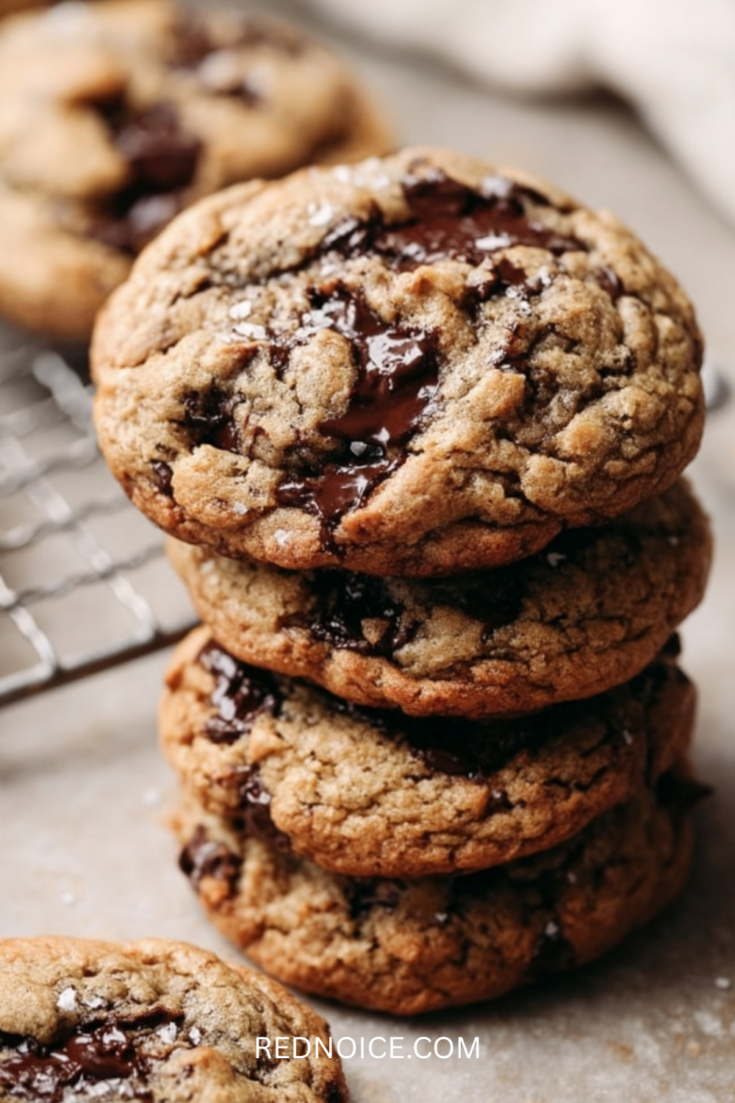
The best Brown Butter Chocolate Chip Cookies! Soft, chewy, and packed with nutty caramel flavor. An easy recipe for bakery-style results.
Ingredients
- 2¼ cups (280g) all-purpose flour
- 1 tsp baking soda
- 1 tsp sea salt
- 1 cup (2 sticks / 227g) unsalted butter
- 1 cup (200g) brown sugar
- ¼ cup (50g) granulated white sugar
- 2 large eggs + 1 egg yolk, room temperature
- 2 tsp pure vanilla extract
- 2 cups (340g) dark or semi‑sweet chocolate chips or chopped chocolate
- Flaky sea salt for topping (optional)
Instructions
- Cut the butter into small pieces and place them in a light‑colored saucepan (a light pan makes it easier to see the color change). Heat over medium heat. As the butter melts, stir frequently. The butter will foam, then subside, and you’ll see golden‑brown bits forming at the bottom of the pan. This usually takes about 5 minutes. Once the butter smells nutty and turns amber‑colored, immediately remove it from the heat and pour it into a large mixing bowl. Be attentive – butter can go from browned to burnt in seconds, so don’t walk away. Let the brown butter cool for 10–15 minutes, until it’s warm but not hot.
- To the cooled brown butter, add both brown and granulated sugar. Whisk until combined. Add the eggs, egg yolk, and vanilla extract. Whisk vigorously for about a minute until the mixture looks slightly lighter and a little thicker.
- In a separate bowl, whisk together the flour, baking soda, and salt. Add the dry ingredients to the wet mixture and fold together with a spatula until just combined and no dry flour remains. Do not overmix.
- Fold in the chocolate chips. The dough will be soft and slightly tacky – that’s normal.
- Cover the bowl and refrigerate for at least 30 minutes. If you’re making the dough a day ahead, you can leave it overnight; the flavor will deepen even more. If you’re in a hurry, you can skip the chilling step, but the cookies are more likely to spread thin without this rest.
- Preheat your oven to 375°F (190°C). Line two baking sheets with parchment paper. Scoop about 2 tablespoons of dough and place on the prepared sheets, spacing them about 2 inches apart. If you prefer thicker cookies, roll the dough balls slightly taller (not wider) before placing them.
- Bake for 11–13 minutes, until the edges are set and golden, but the centers still look soft and slightly underbaked. They will continue to cook in the hot pan. Immediately after removing from the oven, sprinkle each cookie with a pinch of flaky coarse sea salt if desired.
- Let the cookies rest on the baking sheet for about 5 minutes before transferring them to a wire cooling rack to cool completely. Moving them too early may cause them to fall apart.
Nutrition Information:
Yield:
22Serving Size:
1Amount Per Serving: Calories: 238Total Fat: 10gSaturated Fat: 6gUnsaturated Fat: 4gCholesterol: 41mgSodium: 183mgCarbohydrates: 34gFiber: 1gSugar: 14gProtein: 3g
Baking Notes
For chocolate, you can use either chocolate chips or chop a chocolate bar of your choice. The difference is that if you use chocolate chips, the chocolate tends to stay in place and won’t melt, creating puddles throughout the cookie. Chopped chocolate from a bar melts more easily, creating irregular pockets in different places that just add to the cookie’s gooeyness. It’s solely up to your preference. You can also use dark or semi‑sweet chocolate.
For flour measurement, the most accurate method is a kitchen scale. But if you don’t have one accessible, you can use a measuring cup. But be sure to level it off with a spoon so your measurement can stay accurate.
On butter: I noted to use unsalted butter in the ingredient list, but what you have is salted butter; just reduce the salt to 1/2 tsp to account for the salt in the butter.
Common Problems and Their Fixes
Cookies spread too thin: Chill the dough in the fridge for at least 30 minutes before baking to prevent spreading. Better yet, prepare the dough the night before and let it rest in the fridge overnight.
Cookies came out cakey instead of chewy: Cookies turn cakey when there’s too much flour or too many whole eggs. For the second egg, use just the yolk instead of the whole egg. The extra yolk adds richness without the extra moisture that can lead to a cakey texture.
Cookies are too crispy: This usually happens from overbaking. Take the cookies out when the edges are set, but the centers are still soft and glossy. They’ll continue to cook in the hot pan after you pull them from the oven.
Brown butter smells burnt: Burning the butter happens quickly if the heat is too high. Keep the heat at medium, watch it constantly, and use a light‑colored pan so you can see the color change. Don’t use burned butter – if it happens, start over with fresh butter.
How to Store Them
You can store baked cookies in an airtight container for 4–5 days. In our house, they rarely last more than a day or two, but if you’re planning to keep them longer, I recommend adding a small piece of bread to the container. The bread absorbs excess moisture, helping prevent the cookies from drying out.
Variations Worth Trying
Once you get the hang of the base chocolate chip cookie recipe, you can try different variations to fit any occasion and your preferences.
Dark chocolate and sea salt. Use 70–75% dark chocolate chips and generously sprinkle flaky sea salt on top right after the cookies come out of the oven. This version feels sophisticated. The bitterness of the dark chocolate balanced by the saltiness of the flakes is the definition of an elegant cookie — perfect for gifting, serving at a party, or as a hostess gift when you want something that looks and tastes thoughtful.
Brown butter and toffee. Looking for extra crunch? Add ½ cup of toffee bits along with the chocolate chips. Toffee pairs exceptionally well with brown butter — the caramel notes blend perfectly with the butter’s nuttiness, giving you a little crunch in every bite.
Cookies for kids. You can certainly bake these cookies with children, but make sure an adult handles the butter browning and the chopping of the chocolate (if you’re using a bar instead of chips) for safety. All the other steps are great for little hands, and adding the chocolate chips is especially fun for the kids.
Final Note
Baking a delicious batch of bakery‑style brown butter chocolate chip cookies is easier than you think and completely achievable at home without a stand mixer or expensive ingredients. All you need is a little patience and attentiveness when browning the butter, plus time to let the dough rest in the fridge before baking.
The ingredients are pretty much the same as many other cookie recipes, but the magic is in the few extra steps you’re willing to take.
I promise you, these cookies are well worth it. The nutty aroma and caramel‑like richness make them worthy of gifting and serving at any party — from holiday celebrations to casual brunch gatherings.
Make this recipe once, and you’ll want to keep it forever. It’s the kind of cookie that’s both crowd‑pleasing and comforting, with just enough sophistication to make you whip up batches for every cookout.