Protein brownies have a reputation for being dry, rubbery, or noticeably chalky. The problem usually isn’t the idea of adding protein powder—it’s using so much of it that the powder takes over the job normally handled by flour.
This recipe takes a different approach. Protein powder combines with almond flour, Greek yogurt, nut butter, eggs, cocoa, and melted dark chocolate, giving you extra protein without sacrificing the rich, fudgy texture that makes a brownie worth eating.
The melted chocolate is especially important. Cocoa powder provides deep chocolate flavor, but it’s also dry. Melted chocolate adds fat and richness, helping these brownies stay soft and fudgy instead of turning cakey.
There’s also one important difference between these and a typical brownie recipe: you can’t rely on the clock alone to tell you when they’re done. Protein powders vary in how they absorb liquid and react to heat, so the batter texture and final doneness cues matter just as much as the listed bake time.
The result is a rich, chocolatey brownie with a soft center, slightly chewy edges, and about 9–11 grams of protein per square, depending on the protein powder and other brands you use.
Why These Protein Brownies Work

- Fudgy, not chalky. A moderate amount of protein powder balances almond flour, Greek yogurt, nut butter, eggs, and chocolate.
- Real chocolate flavor. Cocoa powder provides intensity while melted dark chocolate adds richness and helps create a fudgier texture.
- About 10g of protein per brownie. Protein powder, eggs, Greek yogurt, nut butter, and almond flour all contribute protein.
- Easy to troubleshoot. The recipe gives you a clear batter-consistency check and a toothpick test so you don’t have to guess.
- Soft without being underbaked. The brownies keep setting as they cool, so pulling them from the oven when the center is still slightly soft helps prevent overbaking.
- Freezer-friendly. Make a batch ahead and freeze individual brownies for an easy snack or dessert.
Fudgy Protein Brownies
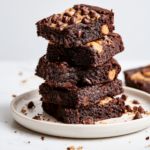
These fudgy protein brownies are rich, chocolatey, and soft in the center with slightly chewy edges. They’re made with protein powder, Greek yogurt, eggs, nut butter, cocoa, and real dark chocolate for a satisfying brownie that doesn’t taste like a protein bar.
- ¾ cup about 70–75g whey or whey-casein blend protein powder
- ½ cup 45g unsweetened cocoa powder
- ½ cup 50g fine almond flour
- 1 teaspoon baking powder
- ¼ teaspoon salt
- 2 large eggs
- ½ cup plain Greek yogurt
- ⅓ cup creamy peanut butter or almond butter (melted)
- ⅓ cup maple syrup or honey
- ¼ cup milk of choice (plus up to 2 tablespoons more if needed)
- 1 teaspoon vanilla extract
- 2 oz about 55g dark chocolate, melted and slightly cooled
- ½ cup dark chocolate chips (divided)
- 1. Prepare the pan. Preheat the oven to 350°F. Line an 8×8-inch baking pan with parchment paper, leaving some overhang on two sides. This makes the finished brownies much easier to lift out and slice.
- 2. Mix the dry ingredients. In a large bowl, whisk together the protein powder, cocoa powder, almond flour, baking powder, and salt. Break up any lumps of protein powder or cocoa before moving on. This is especially helpful with protein powders that tend to clump.
- 3. Mix the wet ingredients. In a separate bowl, whisk the eggs, Greek yogurt, melted nut butter, maple syrup or honey, milk, and vanilla until smooth. Slowly whisk in the melted dark chocolate until combined. Let the melted chocolate cool slightly before adding it so it doesn’t unnecessarily heat the other ingredients.
- 4. Combine and check the batter. Pour the wet mixture into the dry ingredients. Stir gently with a spatula just until no dry streaks remain. Don’t overmix. The finished batter should be thick, fudgy, and spreadable. It should not be stiff like cookie dough. If the batter seems unusually thick or difficult to spread, add milk 1 tablespoon at a time, mixing after each addition. Stop as soon as the batter loosens enough to spread easily.
- Process shot: The batter should look thick and glossy in the bowl, with no large pockets of dry ingredients. It should spread easily into the pan rather than hold together like dough.
- 5. Add the chocolate chips . Fold in half the chocolate chips. Transfer the batter to the prepared pan and spread it evenly into the corners. Scatter the remaining chocolate chips over the top and gently press them into the batter.
- 6. Bake for 17–22 minutes, checking toward the earlier end of the range. The edges should look set while the center still looks slightly soft and fudgy. A toothpick inserted into the center should come out with moist crumbs attached, not wet batter. Don’t wait for a completely clean toothpick. With brownies, that can mean they’ve already gone too far and may dry out as they cool.
- 7. Cool completely. Place the pan on a wire rack and allow the brownies to cool completely before cutting. For cleaner slices and a denser texture, refrigerate the cooled brownies for 30–60 minutes before slicing. Use the parchment overhang to lift the brownies from the pan and cut into 12 squares.
Estimated Nutrition Per Brownie
Protein: About 9–11g per brownie*
*Nutrition and protein will vary depending on the brands and varieties of protein powder, yogurt, nut butter, chocolate, milk, and sweetener you use.
Using the recipe below with typical values for whey or whey-casein protein powder, plain 2% Greek yogurt, creamy peanut butter, maple syrup, almond flour, dark chocolate, dark chocolate chips, and 2% milk, each brownie provides approximately:
- Calories: 200
- Protein: 10g
- Carbohydrates: 17g
- Fat: 11g
- Fiber: 3g
These numbers are estimates, not laboratory-tested nutrition information. For the most accurate nutrition calculation, use the nutrition labels from the specific brands you use.
What Protein Powder Is Best for Brownies?

The type of protein powder you use can noticeably affect both the texture and the amount of liquid the batter needs.
| Protein Powder | What to Expect |
| Whey | Generally gives the softest, most predictable texture for this recipe |
| Whey-casein blend | Excellent option with a fudgy, structured texture |
| Casein | Absorbs more liquid and can produce a thicker batter |
| Pea protein | Can make the batter thicker or drier, depending on the brand |
| Rice protein | May produce a slightly drier or grainier texture |
| Plant-based blend | Results vary considerably depending on the formulation |
For the most predictable results, whey or a whey-casein blend is the best choice.
If you’re using a plant-based protein powder, don’t automatically add extra milk from the beginning. Mix the batter first, check its consistency, and add milk gradually if needed.
Tips for the Best Protein Brownies

Don’t use more protein powder than the recipe calls for
It can be tempting to increase the protein powder to make the brownies “higher protein.” In practice, adding more powder can make the brownies dry, dense, or rubbery.
The goal here is balance. Protein powder contributes protein, while the eggs, yogurt, nut butter, and chocolate help create the texture you actually want.
Pay attention to the batter
The amount of milk listed is a starting point, not a test of whether you followed the recipe correctly.
Different protein powders absorb different amounts of liquid. Your batter is the better guide.
It should be thick and spreadable, not dry, crumbly, or dough-like.
Don’t overbake them
This is probably the most important tip.
The brownies should look slightly soft in the center when they come out of the oven. They’ll continue to firm up as they cool.
Use melted chocolate as well as cocoa
Cocoa powder gives brownies their deep chocolate flavor, but it doesn’t provide the same richness as melted chocolate.
Using both gives you a more satisfying chocolate flavor and helps keep the texture fudgy.
Let them cool before judging the texture
A brownie that looks slightly soft when it’s hot can set up perfectly once cooled.
Cutting into these too early can make the center seem underbaked when it simply hasn’t finished setting.
Chill them for cleaner slices
A short rest in the refrigerator firms the brownies up and makes them easier to cut neatly.
This is particularly useful if you’re making them ahead for meal prep.
Don’t swap almond flour for oat flour without adjusting the recipe
Almond flour and oat flour don’t behave the same way.
Oat flour absorbs more moisture, so a direct substitution can result in a thicker, heavier brownie. If you make the swap, check the batter and be prepared to add a little extra milk.
Easy Protein Brownie Variations

Vegan Protein Brownies
You can make a plant-based version by replacing the eggs with 2 flax eggs and the Greek yogurt with plain soy or coconut yogurt.
For the flax eggs, mix:
- 2 tablespoons ground flaxseed
- 5 tablespoons water
Let the mixture sit for about 5 minutes before using.
Use a plant-based protein powder and make sure the dark chocolate and chocolate chips are dairy-free. Because plant proteins vary considerably, judge the batter by texture and add extra milk gradually if necessary.
No-Bake Protein Brownie Bites
For a completely different, oven-free treat, combine:
- 1 cup protein powder
- 1 cup oat flour
- ½ cup cocoa powder
- ½ cup nut butter
- ⅓ cup honey or maple syrup
- 2–3 tablespoons milk
Mix until a thick dough forms. Roll into 1-inch balls and refrigerate for at least 30 minutes before serving.
This version won’t have the same baked brownie texture, but it’s a quick option when you want a chocolate protein snack without turning on the oven.
How to Enjoy Protein Brownies

These brownies work just as well as a snack as they do as a dessert.
Try them:
- As an afternoon snack with coffee or a glass of milk
- Packed in a lunch box
- Slightly warmed with a spoonful of Greek yogurt
- With a drizzle of peanut or almond butter
- Crumbled over Greek yogurt or oatmeal
- Cut into smaller portions and stored in the freezer for grab-and-go snacks
How to Store Protein Brownies
Because these brownies contain eggs and Greek yogurt, store them in an airtight container in the refrigerator for up to 5 days.
For the best texture, let a refrigerated brownie sit at room temperature for about 10 minutes before eating.
You can also freeze the brownies for up to 2 months. Wrap individual portions tightly before freezing, then thaw them in the refrigerator or at room temperature.
If you like your brownies warm, a few seconds in the microwave can bring back their soft, fudgy texture.
Frequently Asked Questions
Why are my protein brownies dry or rubbery?
The two most common reasons are too much protein powder and overbaking.
Protein powder absorbs liquid differently from regular flour, and too much can make the brownies dense or rubbery. Start with the amount in the recipe and judge the batter by its consistency.
Overbaking is another major culprit. Take the brownies out when the edges are set, but the center still looks slightly soft.
What protein powder is best for protein brownies?
Whey and whey-casein blends tend to give the most predictable results in this recipe. Plant-based protein powders can work, but their liquid requirements and final texture vary more from brand to brand.
Can I use plant-based protein powder?
Yes. Pea, soy, rice, and plant-based blends can all work, but they don’t necessarily absorb liquid the same way whey does.
Start with the listed milk amount and add more, 1 tablespoon at a time, only if the batter is too thick.
Can I make these brownies vegan?
Yes. Replace the eggs with flax eggs, use plant-based yogurt and protein powder, and choose dairy-free dark chocolate and chocolate chips.
See the vegan variation above for the amounts.
Can I use oat flour instead of almond flour?
You can, but it isn’t a perfect substitute. Oat flour absorbs more moisture than almond flour, so the finished batter may be thicker, and the brownies may be heavier.
If you make the swap, use the batter consistency as your guide and add a little extra milk if needed.
Can I make these into no-bake protein balls?
Yes. The no-bake variation above uses protein powder, oat flour, cocoa, nut butter, and a liquid sweetener to create a simple brownie-inspired snack.
Can I make these sugar-free?
You can experiment with a sugar-free syrup alternative and sugar-free chocolate chips, but the texture may change because different sugar-free syrups vary in consistency.
If you make this substitution, add the liquid gradually and adjust based on the batter’s texture.
Can I double this protein brownie recipe?
Yes. Double the ingredients and use a 9×13-inch pan.
Because pan material and oven performance can affect baking time, begin checking for doneness around the 22-minute mark. Look for set edges, a slightly soft center, and moist crumbs on the toothpick rather than relying only on the clock.
More High-Protein Treats You’ll Love
If you enjoy these brownies, try another easy protein-focused treat next:
- High-Protein Chocolate Chip Cookies
- No-Bake Protein Energy Balls
- High-Protein Peanut Butter Cups
- Protein Overnight Oats
Final Thoughts
If you’ve avoided protein brownies because they’ve always turned out dry, dense, or rubbery, this recipe is worth trying.
The key isn’t cramming as much protein powder as possible into the batter. It’s finding the right balance between protein powder, moisture, fat, and chocolate—and then knowing when to take the brownies out of the oven.
Keep the batter thick but spreadable, add milk gradually when needed, and don’t wait for a perfectly clean toothpick. Once the brownies cool completely, you’ll get the dense, chocolatey, fudgy texture you’re looking for without making them taste like a protein bar.