Valentine’s Day is just around the corner, and I’m excited to share my favorite Valentine’s Day desserts with you!
Whether you’re planning a romantic dinner at home, need treats for a classroom party, or hosting a galentine’s celebration with friends, this collection has something for every occasion.
I’ve been making Valentine’s Day desserts for years. It all began when my daughter’s preschool needed classroom treats, and now it’s a tradition I truly look forward to every year.
These 12 recipes are the ones I return to year after year because they’re reliably delicious, genuinely easy to make, and always get great reactions.
You’ll find everything from quick no-bake options to slightly more elegant layer cakes, but nothing here requires professional equipment or hard-to-find ingredients. If you can follow a recipe, you can make every single one of these.
Why These Valentine Desserts Work

The recipes I’m sharing today are designed for real home kitchens with real time constraints. I don’t have specialized baking equipment or hours to spend decorating, and I’m guessing you don’t either.
Most of these can be made ahead of time, which is honestly the key to enjoying any holiday instead of spending it stressed in the kitchen.
I’ve organized them by category—cookies, brownies, no-bake treats, bars, and cakes—so you can quickly find what you’re looking for.
Even the fancier options here are truly beginner-friendly. I promise that if I can make these while managing a busy household, you absolutely can too.
Valentine’s Day Cookies
1. Strawberry Cheesecake Cookies

These cookies are always the first to go when I make them. They mix two classic Valentine flavors, strawberry and cheesecake, into a treat that looks and tastes great.
The soft sugar cookie base gets topped with sweetened cream cheese and a dollop of strawberry jam or fresh strawberries. I brought these to a cookie exchange last year and had several people ask for the recipe, which is always the best compliment.
Makes: 24 cookies | Time: 45 minutes
Ingredients:
- 2¾ cups all-purpose flour
- 1 tsp baking soda
- ½ tsp salt
- 1 cup butter, softened
- 1½ cups sugar
- 1 egg
- 1 tsp vanilla extract
- 8 oz cream cheese, softened
- ½ cup powdered sugar
- ½ cup strawberry jam or diced fresh strawberries
Instructions:
- Preheat your oven to 350°F and line baking sheets with parchment paper.
- In a medium bowl, whisk together the flour, baking soda, and salt. In a separate large bowl, beat the butter and sugar with an electric mixer for about 2 minutes until light and fluffy.
- Add the egg and vanilla to the butter mixture and beat until well combined. Gradually add the flour mixture, mixing just until incorporated.
- Roll the dough into 1-inch balls and place them on your prepared baking sheets. Use your thumb to make an indentation in the center of each cookie.
- Bake for 10-12 minutes until the edges are lightly golden. Allow the cookies to cool completely on the baking sheet.
- Beat together the cream cheese and powdered sugar until smooth. Pipe or spoon the mixture into each cookie indentation. Top with a small amount of strawberry jam or a piece of fresh strawberry.
Make-Ahead Tip: Bake the cookies up to 2 days ahead, then store them in an airtight container at room temperature. For best freshness, add the cream cheese filling and strawberry topping on the day you plan to serve them.
2. Chocolate Covered Strawberry Cookies

I love these because they taste just like chocolate-covered strawberries, but in a cookie. Using strawberry cake mix gives them a pretty pink color and makes the recipe very simple.
The chocolate dip adds an elegant touch, making the cookies perfect for both casual parties and more formal dessert spreads.
Makes: 30 cookies | Time: 35 minutes
Ingredients:
- 1 box strawberry cake mix
- 2 eggs
- ⅓ cup vegetable oil
- 1 tsp vanilla extract
- 2 cups chocolate chips
- 2 tbsp coconut oil
- Pink or red sprinkles (optional)
Instructions:
- Preheat your oven to 350°F and line baking sheets with parchment paper.
- In a large bowl, mix together the cake mix, eggs, oil, and vanilla until well combined. Roll the dough into 1-inch balls and place on your prepared baking sheets.
- Bake for 8-10 minutes until the cookies are set. Allow them to cool completely—this is important for the chocolate coating to work properly.
- Melt the chocolate chips and coconut oil together in the microwave, stirring every 30 seconds until smooth. Coconut oil helps create a nice, glossy finish.
- Dip each cookie halfway into the melted chocolate, then return it to the parchment paper. If using sprinkles, add them immediately before the chocolate sets.
- Let the chocolate set at room temperature for about 30 minutes, or refrigerate for 10 minutes if you’re short on time.
Perfect For: These work beautifully for classroom parties and look elegant on dessert platters for adult gatherings.
3. Red Velvet Sugar Cookies

Red velvet in cookie form has become a Valentine’s Day tradition in our house. These soft, chewy cookies have that classic red velvet flavor with just a hint of cocoa, topped with cream cheese frosting.
The dough is easy to work with, rolls cleanly, and—most importantly—holds its shape beautifully, making these perfect for heart-shaped cookie cutters and festive decorating.
Makes: 24 cookies | Time: 55 minutes (includes chilling)
Ingredients:
- For the cookies:
- 2¾ cups all-purpose flour
- 1 tbsp cocoa powder
- ½ tsp baking soda
- ½ tsp salt
- 1 cup butter, softened
- 1¼ cups granulated sugar
- 1 egg
- 2 tsp vanilla extract
- 1 tsp white vinegar
- 1 tbsp red gel food coloring
For topping:
- 8 oz cream cheese frosting
- Valentine sprinkles (optional)
Instructions:
- In a medium bowl, whisk together the flour, cocoa powder, baking soda, and salt. Set aside.
- In a large bowl, beat the butter and sugar together for about 2 minutes, until light and fluffy.
- Beat in the egg, vanilla extract, vinegar, and red food coloring until fully combined and evenly colored.
- Gradually add the dry ingredients, mixing just until incorporated. The dough should be soft but not sticky.
- Divide the dough into two discs, wrap in plastic wrap, and refrigerate for at least 30 minutes. This step ensures clean cuts and prevents spreading.
- Preheat oven to 350°F and line baking sheets with parchment paper. Roll chilled dough on a lightly floured surface to about ¼-inch thickness. Cut with heart-shaped cookie cutters and place on prepared baking sheets.
- Bake for 9–11 minutes, until the edges are set and the centers look just matte. Do not overbake—these cookies should stay soft.
- Let cookies cool completely before frosting with cream cheese frosting. Decorate with sprinkles if desired.
Baker’s Note: These cookies taste even better the next day. You can bake and store them in an airtight container up to 1 day in advance, then frost just before serving for the freshest flavor and appearance.
4. Strawberry Kiss Cookies

These adorable cookies are as simple as they are delicious. Using a strawberry cake mix creates a soft, flavorful cookie base, and pressing a Hershey’s Kiss into the center adds the perfect chocolate touch.
They’re particularly popular with kids and make wonderful classroom treats that come together quickly.
Makes: 36 cookies | Time: 30 minutes
Ingredients:
- 1 box strawberry cake mix
- 2 eggs
- ⅓ cup vegetable oil
- 36 Hershey’s Kisses, unwrapped
- Pink or red colored sugar for rolling
Instructions:
- Preheat your oven to 350°F. In a large bowl, mix together the cake mix, eggs, and oil until well combined.
- Roll the dough into 1-inch balls, then roll each ball in colored sugar to coat.
- Place the cookies on parchment-lined baking sheets, spacing them about 2 inches apart.
- Bake for 8-10 minutes until the cookies are set. Immediately press a Hershey’s Kiss into the center of each hot cookie.
- Let the cookies cool on the baking sheet for 5 minutes before transferring to a wire rack.
Time-Saver: The cake mix base makes these incredibly quick and practically foolproof—perfect for last-minute baking needs.
Heart-Shaped Brownies & Brownie Treats
5. Red Velvet Brownies

These red velvet brownies are a true show-stopper. They’re rich and fudgy with that classic red velvet flavor, finished with a beautiful cream cheese swirl that makes them look bakery-worthy with very little effort.
They strike the perfect balance between impressive and achievable, which is exactly why they’re always a favorite for Valentine’s Day desserts.
Makes: 16 brownies | Time: 50 minutes
Ingredients:
For the brownies:
- ¾ cup unsalted butter, melted
- 1½ cups granulated sugar
- 3 large eggs, room temperature
- 1 tsp white vinegar
- 1 tbsp red gel food coloring
- 1 tsp vanilla extract
- 1 cup all-purpose flour
- ¼ cup cocoa powder
- ½ tsp baking soda
- ½ tsp salt
For the cream cheese swirl:
- 8 oz cream cheese, softened
- ¼ cup granulated sugar
- 1 large egg
Instructions:
- Preheat oven to 350°F. Line a 9×9-inch baking pan with parchment paper or lightly grease it. (This pan size ensures thick, fudgy brownies.)
- Preheat oven to 350°F. Line a 9×9-inch baking pan with parchment paper or lightly grease it. (This pan size ensures thick, fudgy brownies.)
- Sprinkle the flour, cocoa powder, baking soda, and salt over the wet mixture. Gently fold just until combined—do not overmix.
- In a separate bowl, beat the cream cheese, sugar, and egg until smooth and creamy.
- Pour the brownie batter into the prepared pan and smooth the top. Drop spoonfuls of the cream cheese mixture over the batter, then gently swirl it through the top with a knife.
- Bake for 32–36 minutes, until the edges are set and a toothpick inserted in the center comes out with moist crumbs, not wet batter.
- Allow brownies to cool fully in the pan before slicing. This is key to clean cuts and optimal texture.
Why These Work: For extra-clean slices, refrigerate the brownies for 30 minutes after cooling, then cut with a sharp knife, wiping it clean between cuts.
6. Heart-Shaped Brownies

Sometimes the simplest approach is the best approach. This recipe starts with your favorite brownie mix and transforms it into festive Valentine treats with just a cookie cutter and some pink frosting.
The presentation makes all the difference, and these always get wonderful reactions despite being so straightforward to make.
Makes: 12-16 heart brownies | Time: 50 minutes
Ingredients:
- 1 box brownie mix (plus required ingredients listed on the box)
- Pink or red frosting
- Valentine sprinkles
- Edible glitter (optional)
Instructions:
- Prepare and bake the brownies according to package directions in a 9×13-inch pan. This is important: let them cool completely before cutting. Room temperature brownies cut much more cleanly.
- Use a heart-shaped cookie cutter to cut brownie hearts from the pan. Press straight down and lift straight up for the cleanest edges.
- Frost each brownie heart with pink or red frosting.
- Decorate with Valentine sprinkles, edible glitter, or conversation hearts.
Decorating Tip: For the best presentation, use a variety of Valentine-themed toppings—conversation hearts, red jimmies, and heart-shaped confetti sprinkles all work beautifully. Also, for perfectly clean edges, place the cooled brownie pan in the freezer for 25-30 minutes before cutting with a cookie cutter.
No-Bake Valentine Treats
7. Cupid Puppy Chow (Valentine Muddy Buddies)

This sweet-and-salty snack is always a crowd favorite. The combination of crunchy cereal coated in chocolate and powdered sugar, mixed with Valentine candies, makes it absolutely addictive.
I love that this requires no baking and can be made several days ahead, which takes so much pressure off during a busy holiday week.
Makes: 10 cups | Time: 15 minutes
Ingredients:
- 9 cups Rice Chex cereal
- 2 cups white chocolate chips
- 3 tbsp butter
- 1½ cups powdered sugar
- Pink food coloring or strawberry extract (add coloring sparingly)
- 1 cup Valentine M&Ms
- ½ cup conversation hearts (optional)
Instructions:
- Pour the cereal into a large bowl.
- In a microwave-safe bowl, melt the white chocolate chips and butter together in 30-second intervals, stirring between each interval until smooth.
- Stir in a few drops of pink food coloring or ½ teaspoon strawberry extract for flavor.
- Pour the chocolate mixture over the cereal and gently stir until evenly coated.
- Transfer the coated cereal to a large zip-top bag along with the powdered sugar. Seal the bag and shake until all the cereal is well coated.
- Spread the mixture on parchment paper to cool completely. Once cooled, mix in the Valentine M&Ms and conversation hearts.
- Store in an airtight container for up to one week.
Perfect For: Ideal for class parties, office treats, or keeping on hand for snacking during movie nights.
8. Valentine Chocolate Bark

Chocolate bark is one of those recipes that look incredibly impressive yet require minimal skill. The key is to work quickly once the chocolate has melted and to have all your toppings ready.
The combination of colors and textures makes this a beautiful addition to any dessert table.
Makes: 16 pieces | Time: 20 minutes (plus chill time)
Ingredients:
- 1 lb white chocolate or milk chocolate
- ½ cup freeze-dried strawberries, crushed
- ½ cup conversation hearts
- Pink and red sprinkles
- ¼ cup chopped pistachios (optional)
Instructions:
- Line a baking sheet with parchment paper.
- Melt the chocolate in the microwave in 30-second intervals, stirring thoroughly between each interval until completely smooth.
- Pour the melted chocolate onto the prepared baking sheet and use a spatula to spread it into an even layer about ¼-inch thick.
- Working quickly, sprinkle the freeze-dried strawberries, conversation hearts, sprinkles, and pistachios over the chocolate before it sets.
- Refrigerate for 30 minutes until the chocolate is completely firm.
- Break the bark into irregular pieces. Store in an airtight container in a cool place for up to 2 weeks.
Gift Idea: Package the bark in clear cellophane bags tied with ribbon for easy, elegant Valentine’s Day gifts.
9. Homemade Reese’s Valentine Hearts

These homemade peanut butter cups are surprisingly easy to make and taste even better than store-bought versions. Silicone heart molds are perfect for Valentine’s Day, though you can use any shape you have on hand.
They’re wonderful for gift-giving or serving at parties, and you can make them well in advance.
Makes: 24 hearts | Time: 30 minutes (plus chill time)
Ingredients:
- 1 cup creamy peanut butter
- ¼ cup butter, softened
- 1 cup powdered sugar
- 1 tsp vanilla extract
- 2 cups milk chocolate chips
- Heart-shaped silicone molds
Instructions:
- In a medium bowl, mix together the peanut butter, butter, powdered sugar, and vanilla until smooth and well combined.
- Melt the chocolate chips in the microwave, stirring every 30 seconds until completely smooth.
- Spoon a thin layer of melted chocolate into each heart mold, just enough to coat the bottom.
- Add a small amount of peanut butter mixture to each mold, leaving room at the top. Cover with more melted chocolate to completely seal.
- Refrigerate for at least 30 minutes until completely firm. Pop the hearts out of the molds.
- Store in the refrigerator for up to 2 weeks.
Allergy-Friendly Option: These work beautifully with sunflower seed butter if you need a peanut-free version for classroom parties or guests with allergies.
10. Red Velvet Truffles
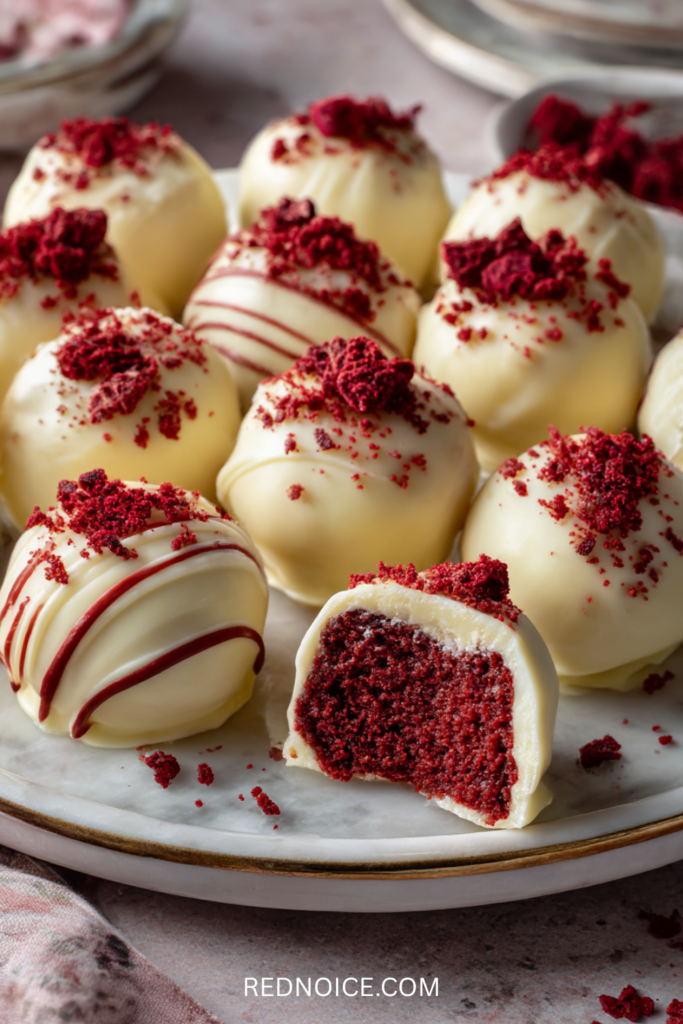
These elegant, no-bake truffles are perfect for gift-giving or serving as a sophisticated dessert. The process is simpler than it looks—you’re essentially making cake balls with a fancy chocolate coating.
They freeze beautifully, making them ideal to prepare well in advance.
Makes: 30 truffles | Time: 40 minutes (plus chill time)
Ingredients:
- 1 box red velvet cake mix (baked and cooled according to package directions)
- 1 cup cream cheese frosting
- 2 cups white chocolate chips
- Red sprinkles or crushed freeze-dried strawberries
Instructions:
- Once your cake has cooled completely, crumble it into very fine crumbs in a large bowl.
- Add the cream cheese frosting and mix thoroughly until the mixture holds together well. Roll into 1-inch balls and place on a parchment-lined baking sheet. If the mixture feels too soft, chill for 10 minutes before rolling.
- Refrigerate for 30 minutes until the balls are firm.
- Melt the white chocolate chips in the microwave, stirring every 30 seconds until smooth.
- Dip each truffle in the melted chocolate, allowing excess to drip off, and return to the parchment paper.
- Immediately top with sprinkles or crushed freeze-dried strawberries before the chocolate sets.
- Refrigerate until the chocolate coating is completely firm. Store in the refrigerator for up to 1 week, or freeze for up to 1 month.
Make-Ahead Advantage: These freeze exceptionally well, so you can make them weeks in advance and have one less thing to worry about on Valentine’s Day.
Valentine’s Day Cakes
11. Italian Love Cake

This cake has developed quite a following over the years, and once you try it, you’ll understand why. It combines chocolate cake with a creamy ricotta layer and chocolate chips throughout, creating a dessert that tastes remarkably like a chocolate cannoli.
It’s become a Valentine’s tradition in our house because it’s both impressive and genuinely delicious.
Serves: 12 | Time: 1 hour 15 minutes
Ingredients:
- 1 box chocolate cake mix (plus required ingredients)
- 2 cups whole milk ricotta cheese
- ¾ cup sugar
- 4 eggs
- 1 tsp vanilla extract
- 1 (3.4 oz) box instant vanilla pudding mix
- 1 cup milk
- 1 (8 oz) container Cool Whip
- 1 cup mini chocolate chips
Instructions:
- Preheat your oven to 350°F and grease a 9×13-inch pan.
- Prepare the chocolate cake batter according to the package directions, then pour it into your prepared pan.
- In a separate bowl, beat together ricotta, sugar, eggs, and vanilla until smooth. Pour this mixture over the cake batter. It will seem unusual, but the layers will bake together beautifully.
- Bake for 60-70 minutes until a toothpick inserted in the center comes out clean. This takes longer than a regular cake because of the ricotta layer. Allow to cool completely.
- Prepare the pudding by whisking the pudding mix with 1 cup of milk until thickened. Fold in the Cool Whip until well combined.
- Spread the pudding mixture over the cooled cake and sprinkle with mini chocolate chips.
- Refrigerate for at least 2 hours before serving.
Make-Ahead Tip: This cake actually improves after sitting in the refrigerator overnight, making it perfect for preparing the day before you need it.
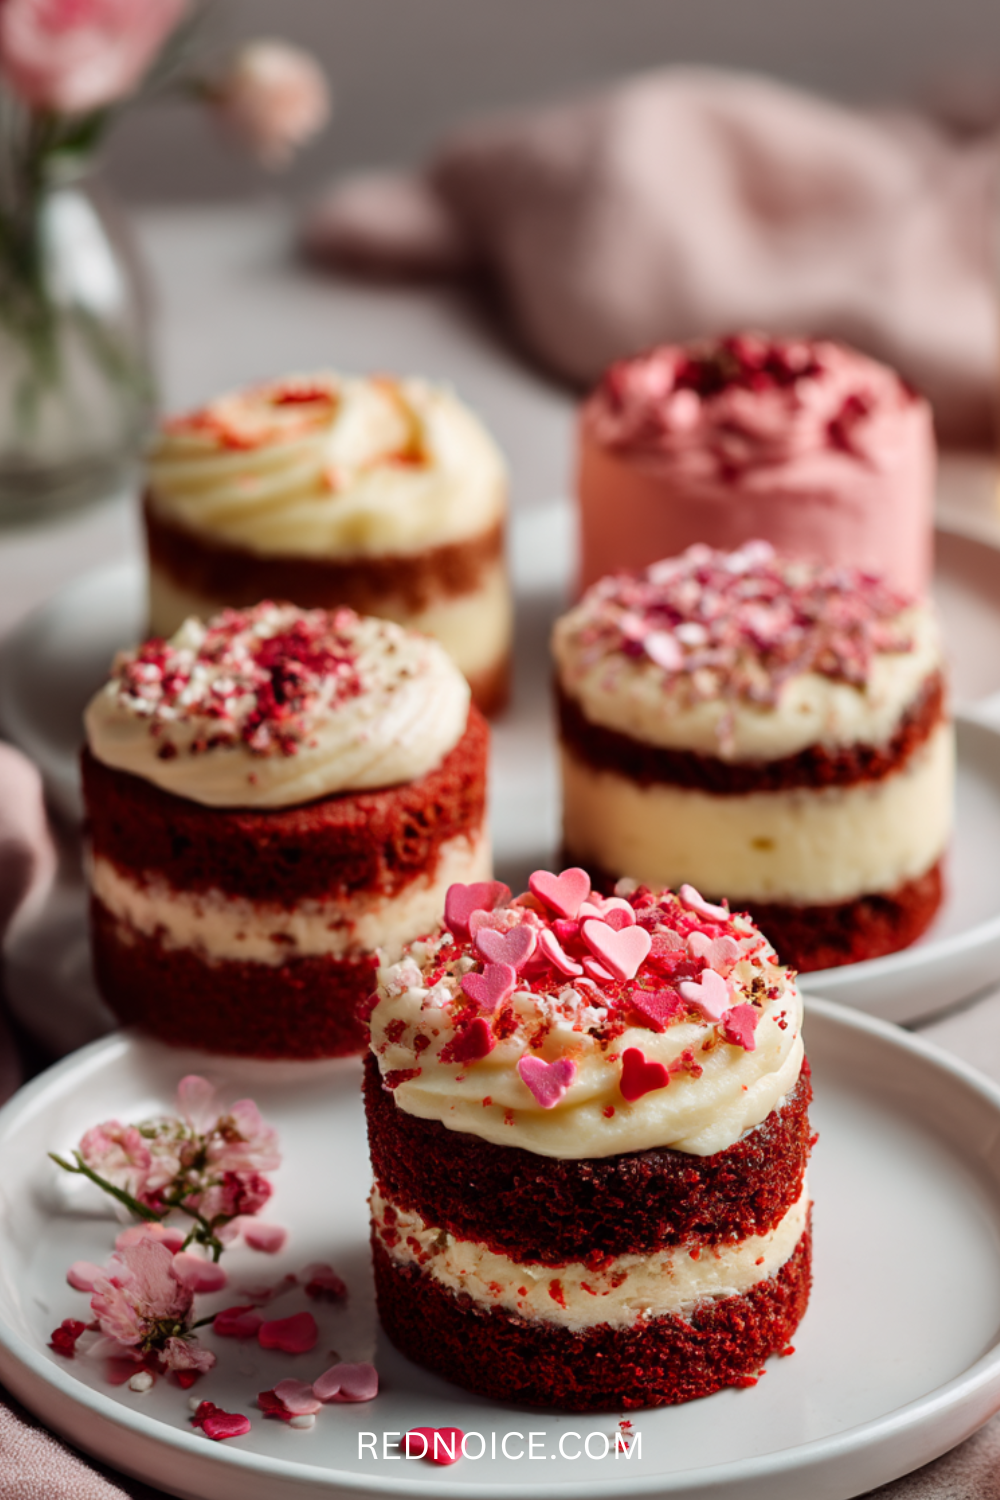
12. Mini Valentine Layer Cakes
These individual 4-inch layer cakes make Valentine’s dinner feel extra special. They’re surprisingly easy to make with a cake mix and require only small cake pans.
The presentation is impressive, and they’re the perfect size for a romantic dinner for two (with leftovers for the next day). Just to let you know, these are petite cakes, not towering layer cakes.
Makes: 4 mini cakes | Time: 1 hour
Ingredients:
- 1 box cake mix (red velvet, strawberry, or chocolate all work beautifully)
- Pink food coloring
- 1 container vanilla frosting
- Heart sprinkles or candy decorations
Instructions:
- Preheat your oven to 350°F and grease four 4-inch cake pans (depth: 2 inches).
- Prepare the cake batter according to the package directions, then divide it evenly among the pans.
- Bake for 18-22 minutes until a toothpick inserted in the center comes out clean. Allow to cool completely.
- Add pink food coloring to the frosting, a little at a time, until you reach your desired shade.
- Slice each cooled cake horizontally to create two layers. Spread frosting between the layers, then frost the outside of each cake.
- Decorate with heart sprinkles or Valentine candies.
Flavor Combination: Red velvet cake with cream cheese frosting is a classic Valentine’s choice that never disappoints.
Planning Your Valentine’s Day Dessert Spread
For a Romantic Dinner at Home
Choose something elegant, such as Italian Love Cake, Red Velvet Truffles, or Mini Valentine Layer Cakes. Pair with coffee, wine, or champagne for a restaurant-quality experience at home.
For Classroom Parties
Opt for travel-friendly, kid-approved options like Cupid Puppy Chow, Heart-Shaped Brownies, or Strawberry Kiss Cookies. These serve large groups and hold up well during transport. Always check with the teacher about allergy restrictions before bringing treats.
For Galentine’s Day Celebrations
Create variety with a dessert spread featuring Strawberry Cheesecake Cookies, Valentine Chocolate Bark, and Strawberry White Chocolate Gooey Bars. Consider setting up a cookie-decorating station as an interactive element.
For Family Celebrations
Batch recipes work best for larger groups: Gooey Bars, Chocolate Bark, and Puppy Chow are all easy to make in large quantities. Getting children involved in the decorating process can turn dessert prep into a fun family activity.
Quick Reference Guide
Most Romantic: Italian Love Cake (#11), Red Velvet Truffles (#10), Strawberry Cheesecake Cookies (#1) (updated last numbers to reflect 12 total)
Best for Kids: Cupid Puppy Chow (#7), Strawberry Kiss Cookies (#4), Heart-Shaped Brownies (#6)
Quickest (30 minutes or less): Valentine Chocolate Bark (#8), Cupid Puppy Chow (#7), Strawberry Kiss Cookies (#4)
Make-Ahead Champions: Red Velvet Truffles (#10), Red Velvet Sugar Cookies (#3), Strawberry White Chocolate Gooey Bars (#11) (updated #13 → #11, removed reference to White Chocolate Raspberry Bundt Cake, which was cut)
Easiest for Beginners: Cupid Puppy Chow (#7), Valentine Chocolate Bark (#8), Strawberry Kiss Cookies (#4)
Final Thoughts on Valentine Desserts
You don’t need professional baking skills or fancy equipment to create memorable Valentine’s Day treats. These recipes are designed to be approachable and reliable—the kind you’ll want to make year after year.
If you’re new to baking, start with the no-bake options. They’re genuinely foolproof and deliver impressive results with minimal effort. If you’re ready for something more involved, the Red Velvet Brownies or Italian Love Cake will absolutely wow your guests while remaining completely achievable.
Choose 2-3 recipes that appeal to you, gather your ingredients, and enjoy the process. Homemade treats always mean more than store-bought because they show the care and effort you’ve put into celebrating the people you love.
Happy Valentine’s Day, and happy baking!