There’s a version of mac and cheese that lives somewhere between the blue box and the three-hour baked casserole — and finding it took me longer than I’d like to admit.
When my daughter was little, box mac and cheese was her number one food. Not just her favorite — her absolute number one. Above everything, I cooked from scratch, including my own homemade version. As a self-appointed five-year-old cheese connoisseur, she had a very clear opinion: the box one was cheesier, and that was that. My made-from-scratch mac and cheese couldn’t compete. I lost that battle repeatedly and eventually just accepted it.
Fast forward to now, and she’s fully upgraded herself — truffle mac and cheese, fancy queso builds, restaurant versions with cheeses I can barely pronounce. The blue box has been retired. But before the mac and cheese baton passed completely from the household box version I couldn’t beat when she was five to the grown-up restaurant versions she loves now, I made it my mission to find the one recipe that could finally win her vote.
It had to be easy enough for a busy weeknight. One pot, minimal cleanup. Under 30 minutes. Budget-friendly ingredients — nothing that requires a special grocery run. Simple enough for picky small eaters, but with enough depth that adults actually want seconds. And it had to be the kind of recipe you can confidently put on the table on Christmas Day alongside holiday dishes, on a random Tuesday when everyone just needs comfort food, or at a Sunday family lunch when you want something crowd-pleasing without the fuss.
This mac and cheese recipe is that version. It won my daughter’s vote. I think it’ll win yours too.
Why One-Pot Mac and Cheese Actually Works
Short answer: Starch is your best friend.
When pasta cooks directly in a smaller amount of liquid rather than in a huge pot of boiling water, the starch it releases stays in the pot. That starch thickens the sauce naturally and helps it cling to every noodle. No roux, no whisking, no flour-lump anxiety.
Butter, cream cheese, and shredded cheese melt directly into that warm starchy base — and the result is silkier and more consistently creamy than a flour-thickened sauce. It’s also significantly more forgiving. If you’ve had bad luck with grainy or broken homemade mac and cheese before, this method is the fix.
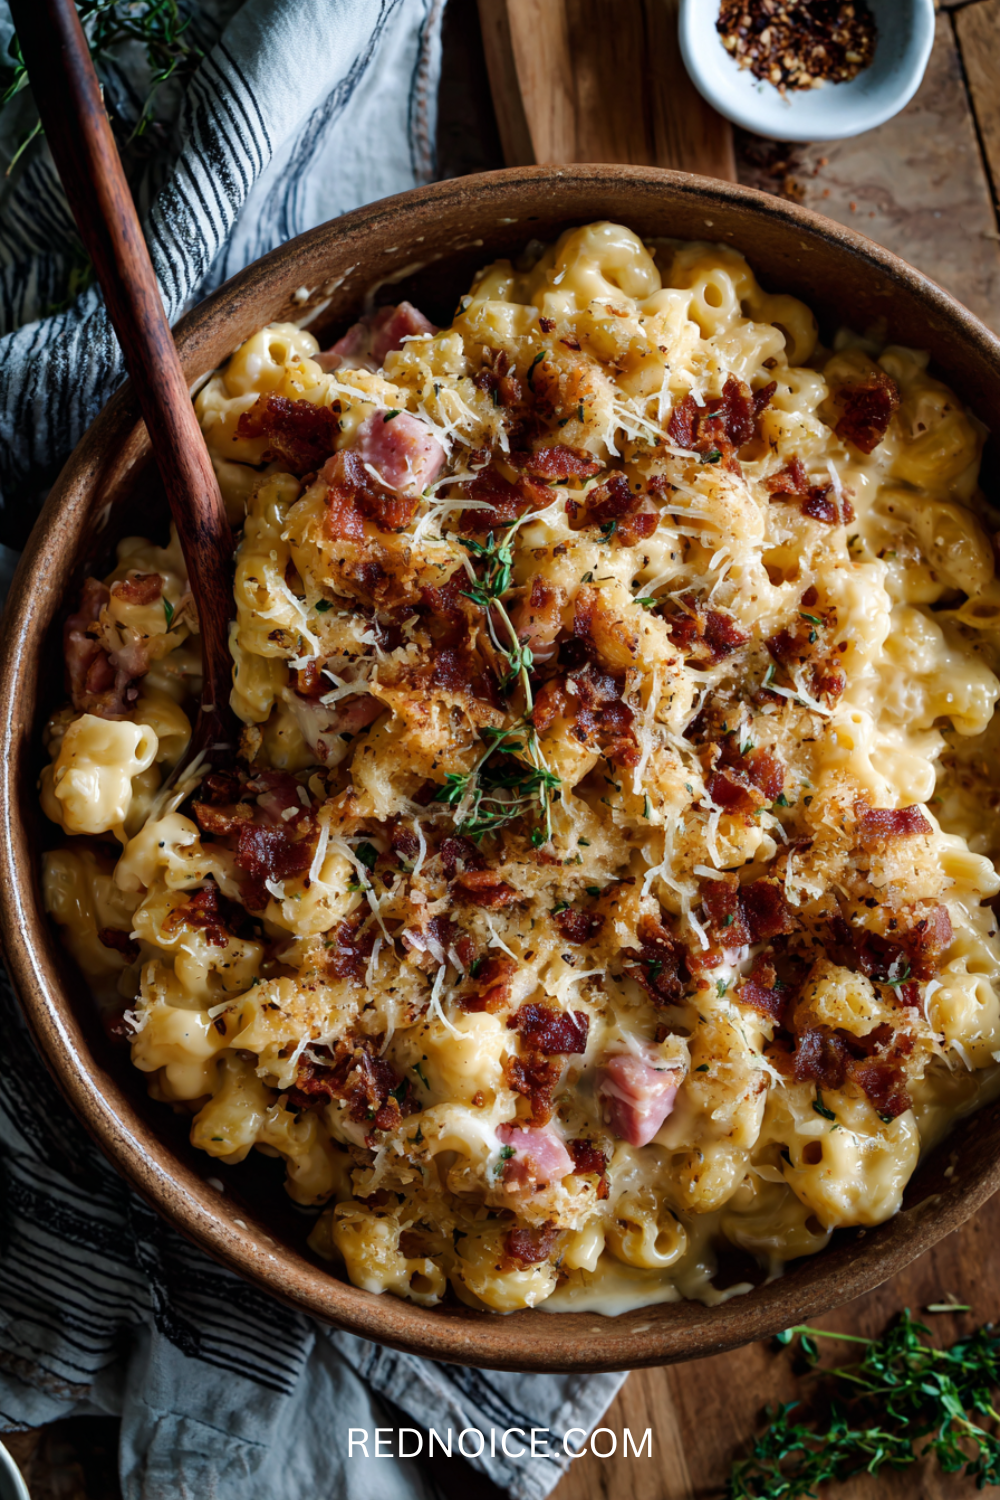
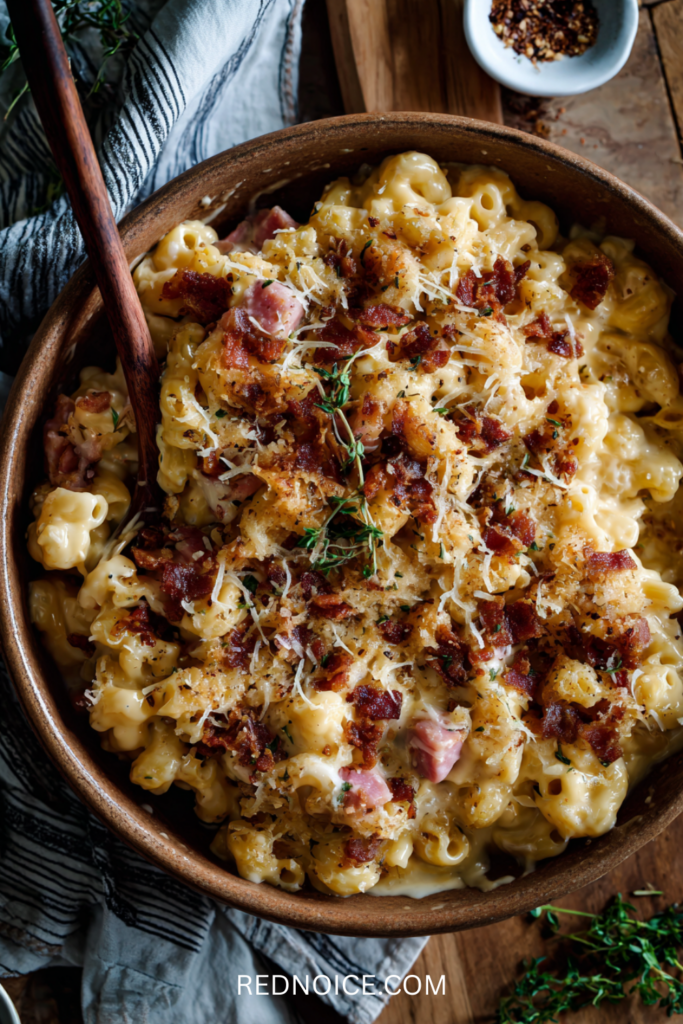
The Cheese Situation — This Is Where Good Mac Becomes Unforgettable
This is where most homemade mac and cheese recipes succeed or fail.
Sharp cheddar is non-negotiable. Pre-shredded bags are coated with starch to prevent clumping, which can cause uneven melting and a grainy texture in a sauce. Buy a block and shred it yourself. Three extra minutes. Makes a noticeable difference.
Monterey Jack or Colby Jack is the secret to a smooth, stable sauce. Mixing in about half a cup alongside the cheddar dramatically reduces the chance of a grainy result. Both melt effortlessly and don’t overpower the cheddar — they just make everything smoother and more cohesive.
Cream cheese is the texture insurance policy. Stirred in by spoonfuls — not chunks, spoonfuls melt faster — it creates a creaminess that holds up as the mac cools. Without it, the sauce can thicken and become gummy within 15 minutes of serving. With it, everything stays glossy and spoonable much longer.
Yes, freshly shredded cheese matters. A lot.
The Spices That Make It Taste Like More
Plain cheese sauce is fine. Seasoned cheese sauce is addictive.
Dry mustard powder is the most important one. It doesn’t make the sauce taste like mustard — it amplifies the cheddar’s sharpness and adds depth that’s hard to pinpoint but immediately noticeable when it’s missing.
Smoked paprika adds warmth and a faint smokiness that complements the richness of the cheese.
Garlic powder rounds out the savory notes without the harshness fresh garlic can bring to a cream sauce.
A pinch of cayenne sharpens the overall flavor without making anything spicy. Just a pinch.
None of these are unusual pantry items. Together, they’re what separates a good bowl from a great one.
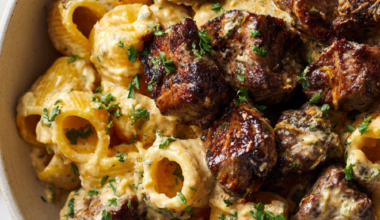
One-Pot Extra Cheesy Mac and Cheese
Ingredients
- 12–14 oz elbow macaroni or cavatappi pasta
- 2 cups low-sodium chicken or vegetable broth
- 2 cups whole milk, plus more as needed
- 1 cup water
- 1 teaspoon salt
- 2 tablespoons unsalted butter
- 3 oz cream cheese, at room temperature
- 2 cups sharp cheddar cheese, freshly shredded from a block
- ½ cup Monterey Jack or Colby Jack cheese, freshly shredded
- 1–2 slices American cheese, torn (optional, for extra melt)
- ½ teaspoon dry mustard powder
- ½ teaspoon smoked paprika
- ¼ teaspoon garlic powder
- Pinch of cayenne pepper
- Salt and black pepper to taste
Optional breadcrumb topping:
- ½ cup panko breadcrumbs
- 2 tablespoons melted butter
- 2 tablespoons grated Parmesan
- Pinch of smoked paprika
Instructions
Step 1: Cook the pasta
In a large heavy-bottomed pot or Dutch oven, combine the pasta, broth, milk, water, and salt. Bring to a medium boil over medium-high heat, stirring frequently to prevent the pasta from sticking to the bottom.
Once boiling, reduce to medium heat and cook for 8 to 9 minutes, stirring every minute or so, until the pasta is just barely al dente. Most of the liquid will be absorbed — what remains should look thick and starchy. That's exactly right.
Do not drain. That starchy liquid is your sauce base.
Step 2: Add the butter
Turn the heat to its lowest setting. The liquid should be warm and steaming — not bubbling. Add the butter directly to the pasta and stir until completely melted, about 60 seconds.
Step 3: Melt the cream cheese
Add the cream cheese in spoonfuls, stirring after each until fully melted, then add the next. The sauce will start coming together and look creamy at this point. Take about 2 minutes here—it's worth doing slowly.
Step 4: Add the shredded cheese
With the heat still on its lowest setting — the sauce should be warm, not bubbling — add the cheddar and Monterey Jack in two or three batches. Stir each batch until fully melted before adding the next. If you see it starting to bubble, pull the pot off the heat and keep stirring. Add the American cheese here if using.
Step 5: Season and finish
Add the dry mustard powder, smoked paprika, garlic powder, and cayenne. Stir to combine. Taste and adjust salt and pepper.
If the sauce is too thick, stir in warm milk a splash at a time. If it seems thin, let it sit over low heat for 2 to 3 minutes—it thickens quickly. Remove from the heat and rest for 2 minutes before serving.
Two minutes off the heat equals a creamier sauce. It sounds insignificant. It isn't.
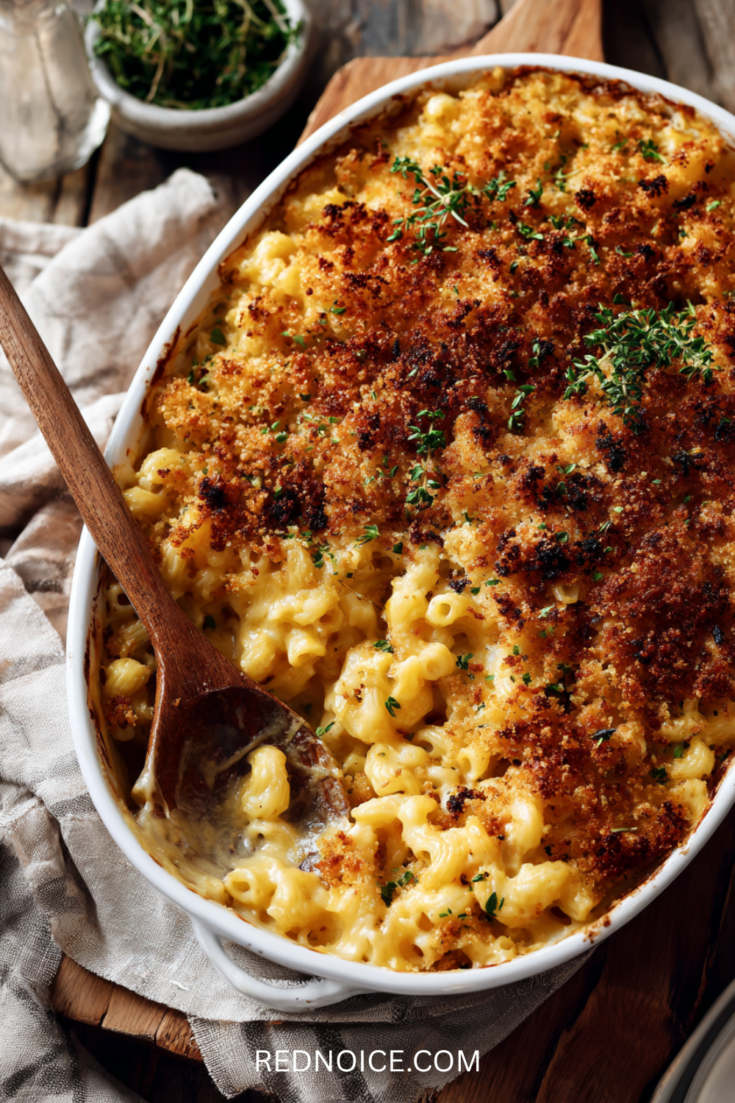
Step 6 (Optional): Breadcrumb topping
Broiler method: Spoon mac and cheese into a baking dish or oven-safe bowls, top with the panko mixture, and broil 2 to 3 minutes until golden. Watch it constantly.
Skillet method (no broiler required): Toast panko in a dry skillet over medium heat, stirring constantly, for 2 to 3 minutes until golden. Toss with melted butter, Parmesan, and paprika, then sprinkle over individual bowls right before serving. Same crunch, zero broiler stress.
Nutrition Information:
Yield:
6Serving Size:
1Amount Per Serving: Calories: 694Total Fat: 53gSaturated Fat: 31gUnsaturated Fat: 22gCholesterol: 147mgSodium: 1637mgCarbohydrates: 24gFiber: 1gSugar: 7gProtein: 33g
How to Adjust the Texture
Prefer it looser and saucier? Add a splash of warm milk right before serving and stir through.
Want it thicker and scoopable? Let it sit 3 to 5 minutes longer off the heat before serving.
Going for ultra creamy? Add an extra spoonful of cream cheese at the end and keep the heat as low as possible while stirring.
Mac and cheese is simple. Technique is everything.
Common Mistakes — And How to Fix Them
Grainy sauce? Almost always pre-shredded cheese or heat that’s too high. Use a freshly shredded block and keep the heat on the lowest setting when adding cheese.
Too thick? Add warm milk, not cold. Cold milk can tighten the sauce rather than loosen it.
Too thin? Let it rest. The starch continues to thicken with heat. Give it two to three minutes before adding anything.
Bland? Add a little more dry mustard—it sharpens the cheese flavor without altering the overall profile. A small squeeze of hot sauce also works well here.
Is the sauce separated, or does it look greasy? The heat was too high when the cheese went in. Pull the pot off the burner entirely next time and let residual heat do the melting. You can often rescue a broken sauce by stirring in a spoonful of cream cheese over very low heat.
Easy Variations Worth Knowing
Baked mac and cheese version: Transfer to a buttered 9×13 baking dish, top with the breadcrumb mixture, and bake at 375°F for 20 to 25 minutes until golden and bubbling. Rest 5 minutes before serving. Great for feeding a crowd.
Dump-and-go crockpot version: Combine uncooked pasta, broth, milk, butter, cream cheese spoonfuls, and all spices in a slow cooker. Cook on high for 2 hours, stirring halfway. Once the pasta is tender, stir in the shredded cheeses in batches on the warm setting. Ideal for potlucks or parties.
Spicy version: Double the cayenne, add ½ teaspoon of hot sauce, and stir in a small can of diced green chiles. The heat cuts through the richness without crossing into actually spicy territory.
Protein add-ins: Shredded rotisserie chicken, crumbled cooked bacon, or diced ham all stir in easily at the end. Any of these turns this from a side dish into a complete dinner with zero additional cooking.
What to Serve with Mac and Cheese
On its own, this is a complete meal — especially for kids.
A sharp green salad cuts through the richness without any extra cooking. Roasted broccoli or cauliflower — stirred in at the end or served alongside — works beautifully against all that cheese. Garlic bread is not necessary, but if there are kids at the table, you already know it’s happening.
Storage and Reheating
Fridge: Up to 4 days in an airtight container. It thickens as it sits — completely normal.
Reheating: Add 2 tablespoons of milk per cup before microwaving. Heat in 60-second intervals, stirring between each, until warmed through.
Meal prep: Portion into containers while still warm, before it fully thickens, for the best reheating texture.
Freezing: The sauce texture changes somewhat after thawing. The baked casserole version holds up better in the freezer than the stovetop version.
Frequently Asked Questions
Why is my homemade mac and cheese grainy? Almost always pre-shredded cheese or heat that’s too high. Shred the block and add cheese in small batches over the lowest heat setting.
Why did my cheese sauce separate? The heat was too high. Keep everything at low heat when adding cheese, and pull the pot off the burner if needed. A spoonful of cream cheese stirred in vigorously can often revive a broken sauce.
What cheese melts best? Sharp cheddar from a block plus Monterey Jack is the most forgiving, foolproof combination. Both melt smoothly and taste classic together.
Can I make this gluten-free? Yes — use gluten-free pasta and certified gluten-free broth. Since there’s no flour roux in this version, it’s simpler to adapt than most mac and cheese recipes.
Can I double the recipe? Yes — use a pot of at least 7 to 8 quarts. The pasta releases a lot of starch, and the liquid can boil up quickly in a pot that’s too small.
Final Thoughts
A good mac and cheese recipe doesn’t need a long ingredient list or an afternoon to be genuinely satisfying. This one-pot version gives you real homemade flavor — proper cheese, real seasoning, actual depth — in about 30 minutes with one pot to wash.
Shred the cheese fresh, keep the heat low when it goes in, and let it rest two minutes before serving. Those three things alone will get you a result that feels far more intentional than the effort required.
From there, it’s yours. More heat, a breadcrumb crust when you feel like it, chicken stirred in on a busier night — the base recipe holds up to all of it.
That’s what a good weeknight dinner should do.